
Dreaming of pull-ups but the bar remains stubbornly still? Street workout resistance bands are your best ally to finally get there. Honestly, it's the smartest tool for progressing at your own pace, whether you're a beginner or experienced. Let's untangle all of this together.
Key Points to Remember
Key Takeaways:
- Bands are the ideal tool to make a movement like the pull-up possible and to learn the technique safely.
- Choosing the right resistance (allowing for 3 to 5 clean reps) and quality equipment (natural latex, sturdy construction) is crucial for progress and injury prevention.
- To avoid stagnation, you must structure your progression with a plan and gradually reduce the band's assistance.
- Their versatility allows you to work far beyond pull-ups (dips, muscle-ups, floor exercises) for balanced muscle development.
- Regularly testing your performance without assistance is essential to measure your real progress and avoid becoming dependent on the band.
Why Use Resistance Bands in Street Workout?
Because calisthenics isn't just about lifting your own body weight. It's about progressing intelligently. Resistance bands are not just a simple accessory; they are the secret lever that will unlock your movements and transform your training.
They Make the Impossible Possible
Do you look at the pull-up bar with a mix of desire and frustration? That's normal. With a resistance band, you will finally feel the correct path of motion. It assists you on the hardest part (the "sticking point") by reducing a portion of the weight you have to lift. Honestly, it's the difference between stagnating for months and achieving your first clean set in just a few weeks.
For Safety and Pure Technique
Another huge, often underestimated advantage: safety. When attempting movements like the muscle-up or handstand push-up, poor technique can be costly. The resistance band provides progressive support that allows you to focus on alignment and muscle feeling, not on the fear of falling. You learn properly, without compensation.
A Tailored and Measurable Progression
Unlike free weights where you add 2.5kg increments, with resistance bands, you can adjust the difficulty in an ultra-gradual way. By playing with the type of band (its resistance), its anchoring point, or even combining it with others, you create a customized progression plan. One day, you do 3 assisted pull-ups with the heaviest band. Two weeks later, you switch to the medium band for 5 repetitions. The satisfaction is direct, tangible.
And one last, purely practical point: they fit into a backpack. Your gym is the park, your garden, your living room. Freedom, in other words.
How to Determine the Right Resistance for You
This is where everything is decided. Choose a resistance that's too light, and you won't progress; too heavy, and you risk injury or frustration. You don't choose an elastic band at random.
Listen to Your Current Level, Not Your Ego
Let's be frank: if you cannot do one complete and clean pull-up without assistance, start with an elastic band offering significant support. The goal is not to suffer, but to perform the movement with perfect technique. A good benchmark? If you can do 3 to 5 strict repetitions with the elastic band, then it is well-calibrated for your strength training. For more than 8 reps, it will be more useful for endurance or warm-up.
Assistance Weight is Tangible
Manufacturers often indicate a strength in pounds (lbs) or kilograms. But what does "15 kg of assistance" really mean? In truth, this value is maximal when the elastic band is most stretched, at the bottom of the movement. At the dead hang (arms extended), the assistance is much weaker. For an absolute beginner, an elastic band providing 20 to 30 kg of maximum assistance is a solid starting point. For someone who can already do 2-3 unassisted pull-ups, a model with 10 to 15 kg of assistance will allow for working on longer sets.
Your Goal Dictates the Color
Are you aiming for your first free pull-up or adding volume to your training?
- For the first pull-up: Prioritize an elastic band that allows you to do sets of 3 to 5 repetitions with impeccable form. The idea is to gradually reduce the assistance.
- For volume and hypertrophy: Use a lighter elastic band that helps you just enough to complete your target sets (for example, going from 8 to 12 reps per set).
Frankly, investing in a variable resistance kit is often the smartest choice. It costs a bit more upfront, but you'll have the full range to progress over several months without buying new equipment. You can then combine two thinner bands for intermediate resistance, a very handy trick.
Our Selection
Hey friends! This time, we're stepping outside the usual sneakers and bags to talk about another aspect of active life: home workout equipment. We tested three products that promise to boost your sessions without cluttering your living room, with a particular focus on versatility and support. Here is our current selection, between core work and support.
| Product | Product Type | Resistance / Support | Versatility | Key Strengths |
|---|---|---|---|---|
| ALongSong Elastics Pilates Bar | Bar + bands kit | 6 levels (20-180 lbs) | Very High | Complete system, adjustable, portable |
| GORNATION Long Elbow Sleeves | Compression sleeves | Targeted compression | Medium | Joint support, comfort, durable |
| Flintronic Elastic Band | Simple resistance bands | 3 levels (0-60 lbs) | High | Lightweight, portable, hypoallergenic |
ALongSong Elastics Pilates Bar
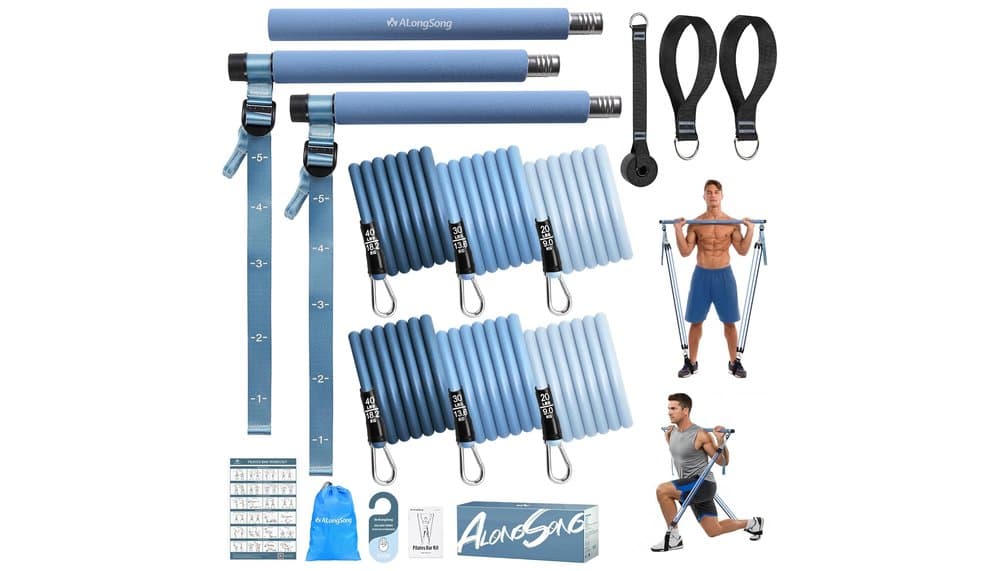
Honestly, this kit is a bit like the Swiss Army knife of home fitness. If you're looking for versatile equipment that goes beyond simple bands, it's a serious option. The system is complete: a central bar that disassembles into three parts, three pairs of bands with different resistances (20, 30, and 40 lbs each), foot straps, and a door anchor. Everything stores in an included bag, which is really convenient.
What won us over is the modularity. You can use a single band for light Pilates or mobility movements, combine several for more intense strength training, and even cross the bands on the bar for a different tension effect. It's ideal for working the entire body: back, shoulders, arms, abs, glutes... The bar, covered in thick foam, offers a good grip. The pre-marked length adjustments are well thought out to adapt the equipment to your body type.
But let's be honest, it's not perfect. The weak point, in our opinion, lies in the perceived quality of the bands. They do the job, but they feel a bit thin compared to other high-end bands. You need to be careful when attaching them to avoid twisting or rubbing against the bar. Also, the system can become a bit cumbersome to set up quickly between two exercises if you change resistance often. It's not the most spontaneous tool for a very dynamic flow.
GORNATION Long Elbow Sleeves
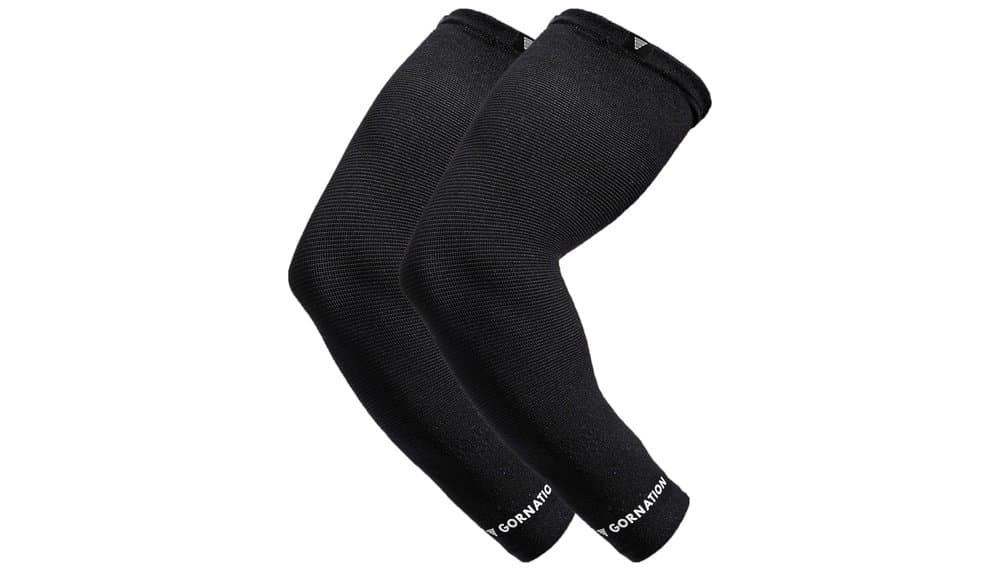
Moving on to a much simpler accessory but terribly effective if you have fragile joints. The GORNATION Long Elbow Sleeves are compression sleeves that cover the forearm, elbow, and a good part of the bicep. Their promise? To provide stability and warmth to the joint during exercise.
We tested them during street workout sessions (pull-ups, dips), weight training, and even cycling. The verdict? They perfectly deliver on their promise. The compression is tangible as soon as you put them on, without cutting off circulation. They don't ride up or roll down, even during wide-ranging movements. The feeling of support at the elbow is real, especially on pushing exercises where a little pain can sometimes appear. They provide a non-negligible psychological effect of protection.
However, there are some limitations. First, size is crucial. You really need to follow the provided sizing guide (based on arm circumference) because if it's too tight, it will be uncomfortable, and if it's too loose, it will slip. Next, in terms of breathability, it's not the best. They heat up quickly. For an indoor session or in cool weather, no problem, but in the middle of summer or for intense cardio, your arms will get hot. Finally, the fabric, although durable, can show signs of wear (rubbing, slight pilling) after several months of intensive use.
Flintronic Elastic Band
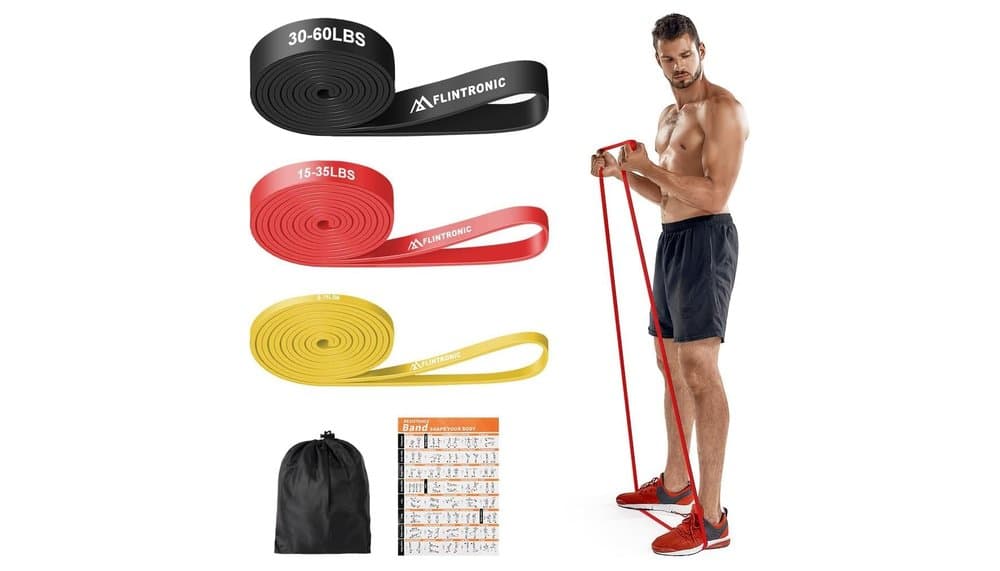
To finish, we return to the essentials with an unbeatable classic: resistance bands. The Flintronic pack stands out for its simplicity and excellent value for money. You get three bands of different levels (yellow, red, black), covering a resistance range of about 15 to 60 lbs. They are made of hypoallergenic TPE, which is a real plus for sensitive skin or those who dislike the smell of latex.
Their great strength is their incredible versatility and lightweight nature. With the included small carrying bag, you can take them anywhere: on vacation, to the park, to the office. You can use them alone for targeted exercises (shoulders, glutes, stretches), or as assistance for your pull-ups and dips if you're a beginner. The heaviest band (black) offers substantial help to overcome a plateau. The ability to combine them also allows for very fine-tuned progression.
But here too, there are caveats. The main criticism we could make concerns elasticity and "snap-back". Compared to high-end bands, they sometimes feel a bit less dynamic, a bit more "soft" in the return phase of the movement. It's not bothersome for most exercises, but for explosive movements where rebound is important, you can feel the difference. Another point: the provided instructions are often in English and the illustrations are quite basic. You'll need to look for your exercises on the web.
Essential Criteria for a Safe Purchase
A resistance band snapping mid-effort is more than just a disappointment: it's dangerous. To avoid this, here are the points you must check before clicking "buy".
Material Quality: Look for Natural Latex
The core of a resistance band is its latex. Always prioritize natural latex. It offers much more consistent and durable elasticity than synthetic rubber. A good test? Stretch it slightly and smell it: real natural latex has a characteristic smell, a bit like new rubber. The smell fades after a few days, but its resistance remains. Frankly, at a low price, you'll often find synthetic rubber which will quickly lose its tension or become brittle.
The Finish of the Ends and the Stitching
This is THE potential breaking point. Observe how the loops or attachments are made.
- Closed-loop bands: The band is fused onto itself. Check that the fusion area is wide, smooth, and uniform, without thinning.
- Bands with handles or straps: The stitching must be reinforced, with strong thread and several overlapping stitches. A simple, straight stitch is a sign of weakness in the medium term.
Length and Width: More Than a Comfort Issue
These dimensions directly influence safety and usage.
- Length: A band that's too short severely limits exercises. For versatile use in street workout (assisted pull-ups, dips, but also floor exercises), aim for a minimum of 120 cm (excluding handles). This gives you enough margin to secure them firmly.
- Width: It's related to resistance, but also to stability. A band that's too narrow (2-3 cm) tends to twist and whip violently upon release. A width of 5 cm or more remains stable and wraps better around a bar.
The Presence of Clear Resistance Marking
A worthy resistance band indicates its resistance legibly, often directly on the latex or on a tag. "Light", "Medium", "Heavy" is too vague. Look for an indication in kilograms of tension (for example: 5-15 kg, 10-25 kg). This allows you to plan your progression precisely. If it's not indicated, be wary: it's often a sign of minimal quality control.
Programming Your Progression and Avoiding Stagnation
Street workout bands are great for breaking through a plateau, but without a plan, you'll quickly spin your wheels. The key is to structure your training so that the assistance progressively decreases. Let me show you how.
Establish Your Plan for Weaning Off the Band
Don't just do random sets. Set a concrete goal for yourself, for example: "Do 3 strict pull-ups without assistance within 6 weeks." Here's how to proceed:
- Determine your starting point: With which band can you perform 5 clean repetitions? That's your base. Let's say you start with a heavy band (black or purple).
- Apply the "two extra reps" rule: Once you can do 3 sets of 8 reps with your current band, add 2 unassisted repetitions at the beginning of each set. For example: 2 naked pull-ups, then 6 with the band. This is a smoother transition than changing resistance all at once.
- Move to the lower level: When you master this new pattern, it's time to trade your band for the next one in the range (e.g., from black to green). You start a new cycle.
Vary the Exercises to Work Different Areas
If you only do assisted pull-ups, you'll get bored and so will your muscles. Bands are versatile, take advantage of them!
- For dips: The principle is the same as for pull-ups. Hook the band between the two parallel bars, put one knee in it, and go for it. This will allow you to work your core and pectorals with an appropriate load.
- For the muscle-up: This is where it gets interesting. Use a thinner band (red or green) to familiarize yourself with the elbow-wrist transition. The assistance helps you get over the bar and feel the movement without having to manage your full body weight. Honestly, it's essential for learning this move properly.
- As negative resistance: This is a formidable trick. For pull-ups, use a thinner band than usual to help you pull up, then remove it slowly to lower yourself as slowly as possible. This eccentric phase greatly strengthens the muscles.
The Trap to Avoid: Dependence on Assistance
The biggest risk with street workout bands is getting too comfortable with them. You think "great, I'm doing 10 reps" but in reality, the band is doing 40% of the work. To avoid this, test yourself naked every two weeks. Perform a maximum set without any assistance at the beginning of your session. Even if it's just one repetition, it's your true indicator of progress. If that number isn't increasing, your program is too comfortable. You need to shock the muscle a bit by varying grips (wide grip, neutral grip) or playing with tempo.
Programming Your Progress and Avoiding Stagnation
This is where the magic happens. Having resistance bands is good. Knowing how to use them to avoid going in circles is better. The goal is not to depend on assistance forever, but to use it as a springboard. Let's structure this.
Your Roadmap for 8 to 12 Weeks
Don't go from a heavy band to nothing overnight. That's the best way to regress or get injured. Plan cycles.
Let's take a concrete example with pull-ups. You are using a thick band that removes 40kg of effort.
- Weeks 1-3: Work on technique and endurance. 4 sets of 8 repetitions, with 2 minutes of rest. The goal is clean movement.
- Weeks 4-6: Increase the volume. Go to 5 sets. Try for 10 repetitions on the first two sets. The band will start to fatigue, that's normal.
- Weeks 7-9: It's time to step down. Replace your thick band with a medium resistance model (which removes about 20-25kg). The first sessions will be difficult! Reduce to 4 sets of 5-6 clean reps. This is where the body really adapts.
- Weeks 10-12: Consolidate. Try to do 4x8 with the new band. At the end of the cycle, test yourself without assistance: maybe you'll achieve 1 or 2 full pull-ups. If not, an additional cycle with the medium band will do the trick.
The Technique of "Progressive Unloading" in Practice
This is my favorite advice, and yet few do it. Instead of doing all your repetitions with the band, use it only for the last reps, the hardest ones.
Let's do the math for dips. Your goal is 10 repetitions.
- Do the first 6 repetitions with no assistance at all. Push yourself.
- Quickly hook your light resistance band (for example around the parallel bars and under your knees) for the last 4 repetitions.
- The following week, try 7 reps without assistance and 3 with.
This method teaches your nervous system to handle the full load, not just the assisted load. It's radically more effective than doing everything with the band.
Go Off the Beaten Path: Vary the Angles
Street workout bands aren't just for pull-ups and dips. This is where your training becomes smart.
- For push-ups: Loop a band around your back and under your hands in a plank position. The resistance increases at the top of the movement, where you are usually stronger. This fills a gap in classic progression.
- For antagonist muscles: Attach a light band to a fixed bar to do horizontal rows or curls for biceps. This balances your development and prevents postural imbalances, especially if you are focused on pushing movements (push-ups, dips).
- For dynamic core work: Attach a band to a pole, hold the other end with both hands, and do torso rotations in a plank position. Excellent for the abdominal wall and obliques.
Frankly, if you only use your bands for the same two exercises, you are missing out on 70% of their potential. A light band and a solid anchor point open up hundreds of possibilities. The idea is to create constant tension, different from gravity, to shock your muscles and make them progress where they are stuck.
Conclusion
Street workout resistance bands transform a simple park into a personalized gym. They are the key to unlocking your progress, safely. So, choose them wisely, and get started. Your next pull-up is waiting.
Frequently Asked Questions
How to choose the resistance of a street workout resistance band?
Choose a resistance that allows you to do 3 to 5 strict repetitions with perfect technique for your target exercise, like pull-ups. For a complete beginner, a band providing 20 to 30 kg of maximum assistance is a good starting point.
Are pull-up bands effective for beginners?
Yes, resistance bands are very effective for beginners because they make the movement possible by assisting on the hardest part, allowing you to learn the correct trajectory and technique safely.
How to avoid stagnation with fitness resistance bands?
To avoid stagnation, structure your progression by first aiming for 3 sets of 8 reps with a band, then add 2 unassisted repetitions at the start of each set before moving to a lower resistance band.
What criteria for choosing a safe, quality resistance band?
Prioritize a band made of natural latex with sturdy end finishes (wide loops or reinforced seams) and clear marking of the resistance in kilograms to ensure its durability and your safety.
Can you do a muscle-up with a resistance band?
Yes, a thin resistance band is ideal for learning the muscle-up, as it assists you during the critical transition above the bar, allowing you to focus on technique without managing your full body weight.
How to use a resistance band to progress in dips?
Hook the band between the two parallel bars, place one knee or both feet in the loop, and execute the movement: the assistance allows you to work on strength and technique with a load suited to your level.
100% free and independent — All our articles are written independently, without any sponsorship. We may receive a commission if you make a purchase through our links, at no extra cost to you.
Guides you might like

Choosing Your HYROX Jump Rope
Choose the right HYROX jump rope to save time and energy. Avoid mistakes with our guide on finding the perfect rope for your event.
Home Gym Hyrox Guide
Start Hyrox training at home. A smart strategy to balance an active life and prepare for the competition efficiently.
Hyrox Dumbbell Buying Guide
Hyrox demands the right gear. Discover the key features for choosing competition-ready dumbbells to maximize performance and safety.
You might also like

HAISSKY Sports Armband Review with Earphone Pocket
HAISSKY Sports Armband review for HYROX: durable, secure phone holder for intense workouts of running, rowing, carries, and burpees.

Funyord Kids' Swim Headband with Ear Plugs Review
Explore why the Funyord Children's Swimming Headband is a surprisingly perfect piece of gear for adult HYROX athletes. Redefine performance essentials.

Kricely Men's Trail Running Shoes Review
Kricely Men's Trail Running Shoes reviewed: Can they withstand the brutal demands of a HYROX competition? Our verdict on their performance and value.